Backup Server Activation: This Was Not a Drill #LXC-Hero

Well what a time we had this week.  There we were, minding our own business, running a few standard:

sudo apt update && sudo apt upgrade

…commands as our server notified us of routine (so we thought) Ubuntu updates.  We have done this many many times.  So, what could go wrong?

After this particular update, which included a kernel change, we were given that lovely notice that says “a reboot is required to make changes take effect”.  We never like that.

We were out of the office.  But this was a security update, so it’s kinda important.  #AGONISE-A-LITTLE.  So, we went to a backup server first, and performed the same update (it was the same OS and it needed the same patches).  We remotely rebooted the backup server and it worked beautifully.  That made us feel better (#FalseSenseOfSecurity).  So, on our primary server, we issued:

sudo reboot

…at the terminal, as we had done many many times before.  As usual, the SSH connection was terminated without notice.  We don’t like that, but that’s the nature of the beast.  We waited to login into our Dropbear SSH terminal so we can remotely unlock our encrypted drives.  With some relief, it appeared!  YAY.  We typed in our usual single command and hit the return key:

unlock

We normally get a prompt for our decryption credentials.  In fact, we ALWAYS get a prompt for our decryption credentials.  #NotToday

Not only did we see something new, it was also, as far as we can google, unique for a Dropbear login:

WhiskyTangoFoxtrot (#WTF).  We are not trying to kill a process.  We are trying to unlock our multiple drives.  What is going on?  We logged back in, and got the same result.  This was not a badly typed command.  This was real.  Our primary server was down. And we mean DOWN.  The Kill process is part of the unlock script, which means the script is not working…which means the OS can’t find the primary encrypted drive.  We actually managed to get a remote screen-shot on the terminal, which was even more unnerving (we figured if Dropbear access was broken, maybe we could log in at the console):

Oh that is an UGLY screen.  After about 30 minutes of scrambling (which is too long – #LESSON1), we realised our server was dead until we could physically get back to it.  Every office IT service was down: our Nextcloud server (mission-critical), our office document server (essential for on-the-road work), our two web sites (this being one of them).  NOTHING worked.  Everything is dead and gone.  Including of course this web site and all the prior posts.

This was our first real-world catastrophic failure.  We had trained for this a couple of times, but did not expect to put that practice into effect.

Today was REAL for us.  So, after too long scrambling in vain to fix the primary server (30 minutes of blackout for us and our customers), we 2FA SSH’d into our live backup server (#1 of 2) and reconfigured a few IP addresses.  We had virtually complete BACKUP COPIES of our lxc containers on server#2.  We fired them up, and took a sharp intake of breath…

And it WORKED.  Just as it SHOULD.  But we are so glad it did anyway!  LXC ROCKS. 

Everything was “back to normal” as far as the world would be concerned.  It took maybe 15 minutes (we did not time it…) to get everything running again.   Web sites, office document file server, cloud server etc. – all up and running.  Same web sites, same SSL certs.  Same everything.  this web site is here (duh), as are all of our prior posts.  We lost a few scripts we were working on, and maybe six-months off our lives as we scrambled for a bit.

We don’t yet know what happened to our primary server (and won’t for a few days), BUT we think we hedged bets against ourselves in several ways: we are a small business.  So… we use the server hardware for local Desktop work too (it’s a powerful machine, with resources to spare).  We now think that’s a weakness: Ubuntu server edition is simply MORE STABLE than Ubuntu Desktop.  We knew that, but thought we would get away with it.  We were WRONG.  Also, we could have lost a little data because our LXC container backup frequency was low (some of these containers are large, so we copy en-mass on a non-daily basis).  We think we got lucky.  We don’t like that.  We think that single LXC backup strategy not ideal now either.  We also have all of our backup servers in one geo-location.  We have worried about that, and we do a little more so today.

All of these constitute a lessons-learned which we might actually document in a separate future article.  But today, boy, do we love our LXC containers.

But without a shadow of doubt, the primary takeaway here is: if you operate mission critical IT assets, you could do a lot worse than running your services in LXC containers.  We know of no downside, only upside.  THANK YOU, Canonical.


Meeting Compliance with the aid of Nextcloud, Cryptomator and Mountain Duck

So like all SysAdmins, we have a lot to worry about in order to continually meet the burdens of compliance.  For us, data residency (location) and digital “state” (encryption status) is very important.

We have had a productive few days improving the PERFORMANCE of our systems by using better-integrated software.  So, why is PERFORMANCE being addressed under compliance?  Well, simply, because if you make a compliant system easier to use, users are more likely to use them, and thus be more compliant.

It’s no secret, we are great fans of Nextcloud – we self-host our cloud server, and because we use that to host our data, we use several different security layers to help thwart accidental and malicious exposure.  Our cloud server, based at our office HQ in Tennessee, is where we store all of our important data.  So we try to make it secure.

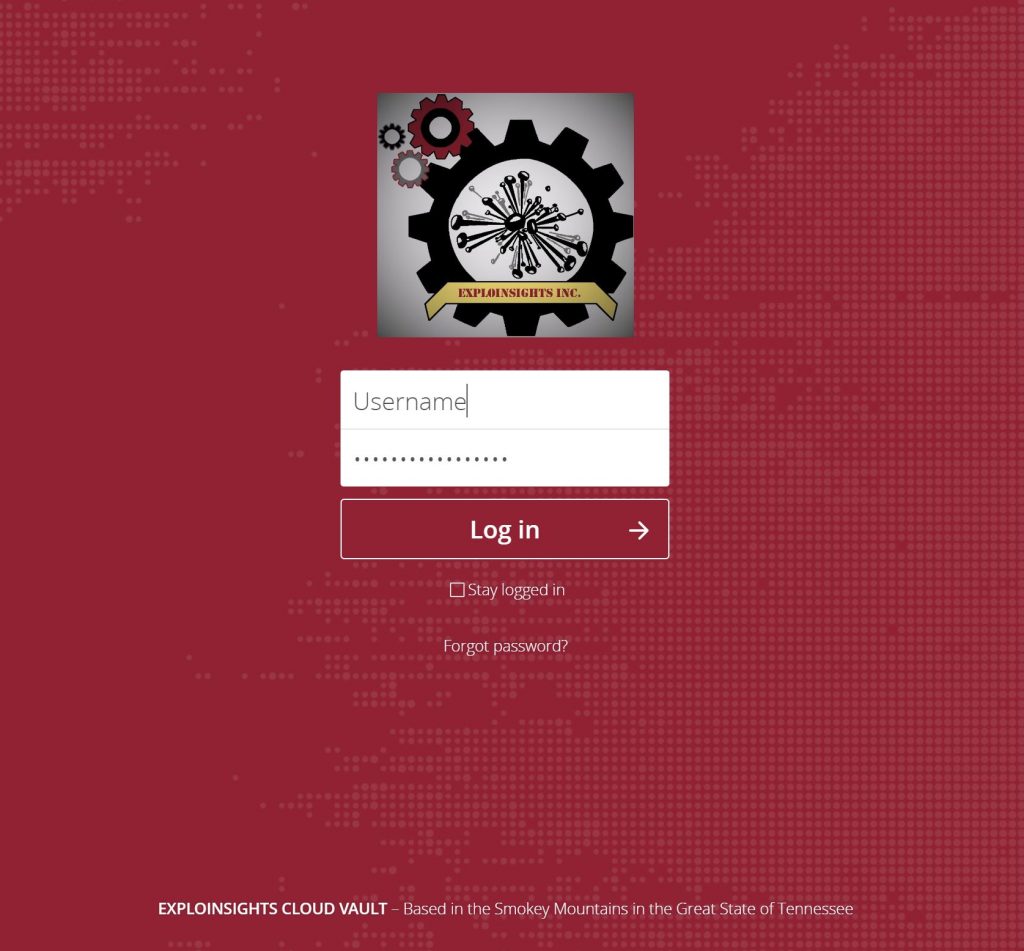
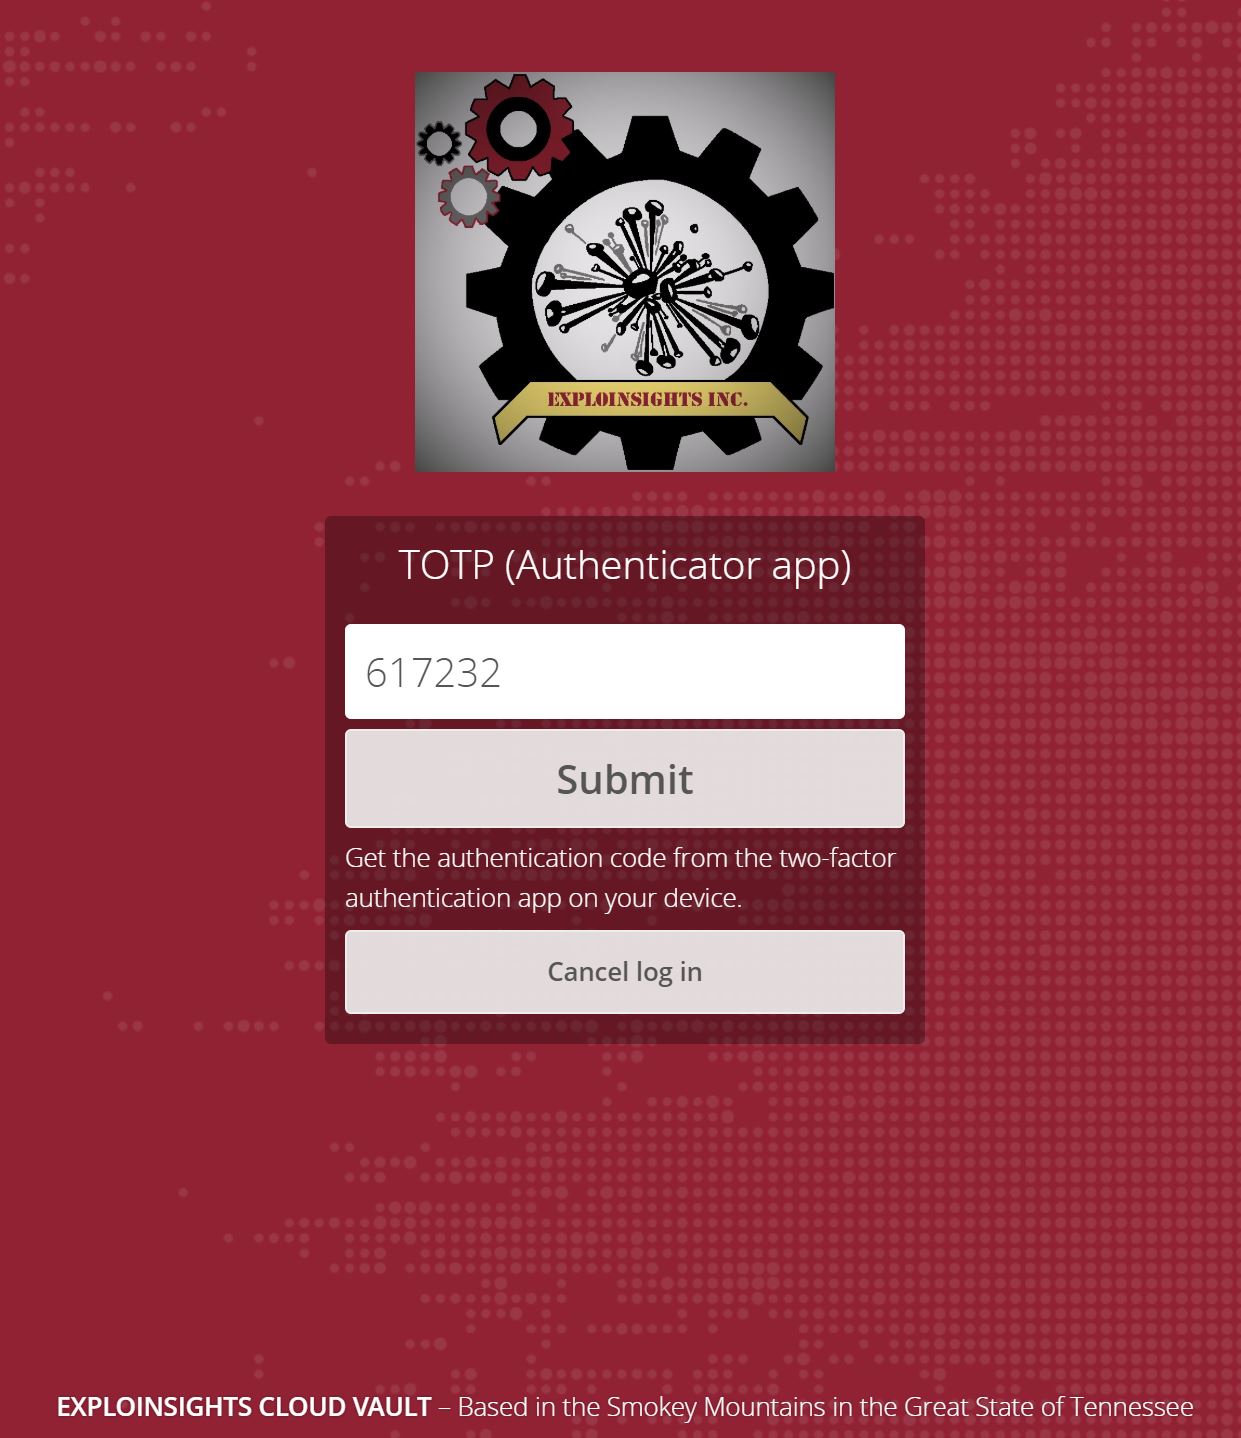
Firstly, our cloud server can only be accessed by HTTPS (SSL/TLS).  Logging in requires 2FA credentials:

This gets you to the next step:

So this is good.  And we have server-side encryption enabled in Nextcloud, which provides an additional layer of security – not even the SysAdmin can read the client data on the server.

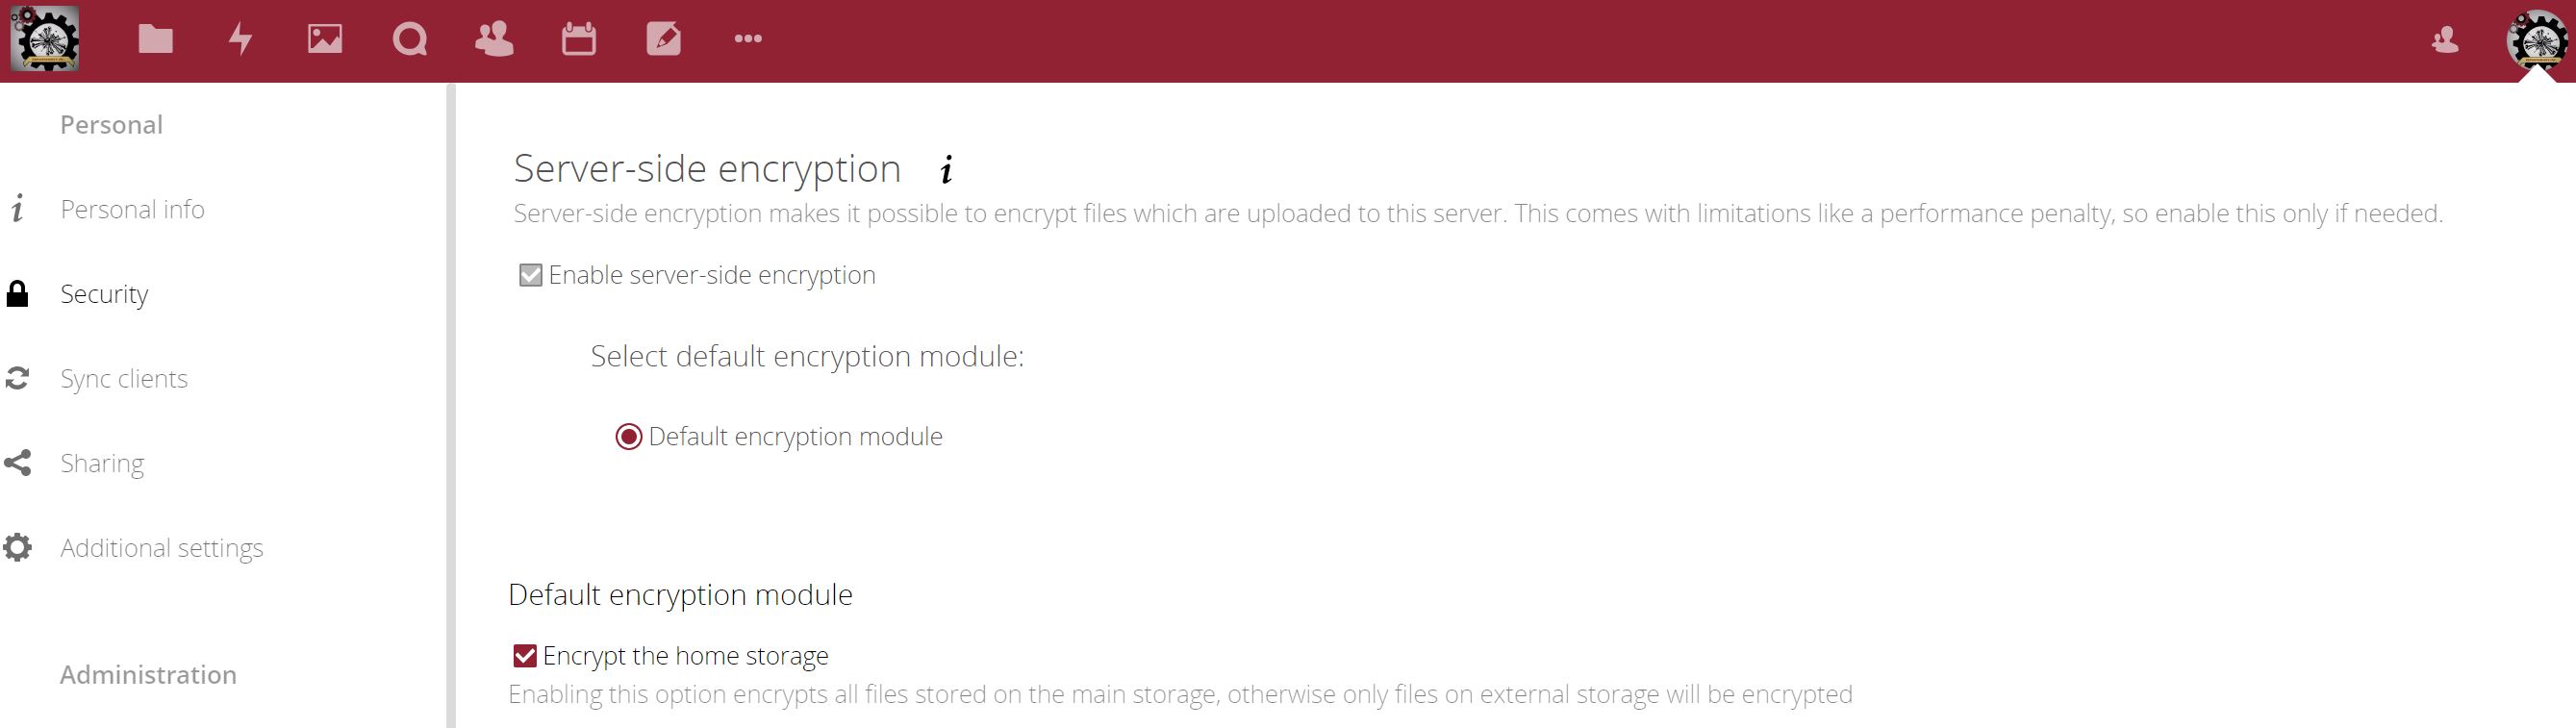
This is cool.  Server-side encryption does help us with sharing of files to customers, but because the decryption key is stored on the server, we don’t like to rely solely on that for protecting our important data.

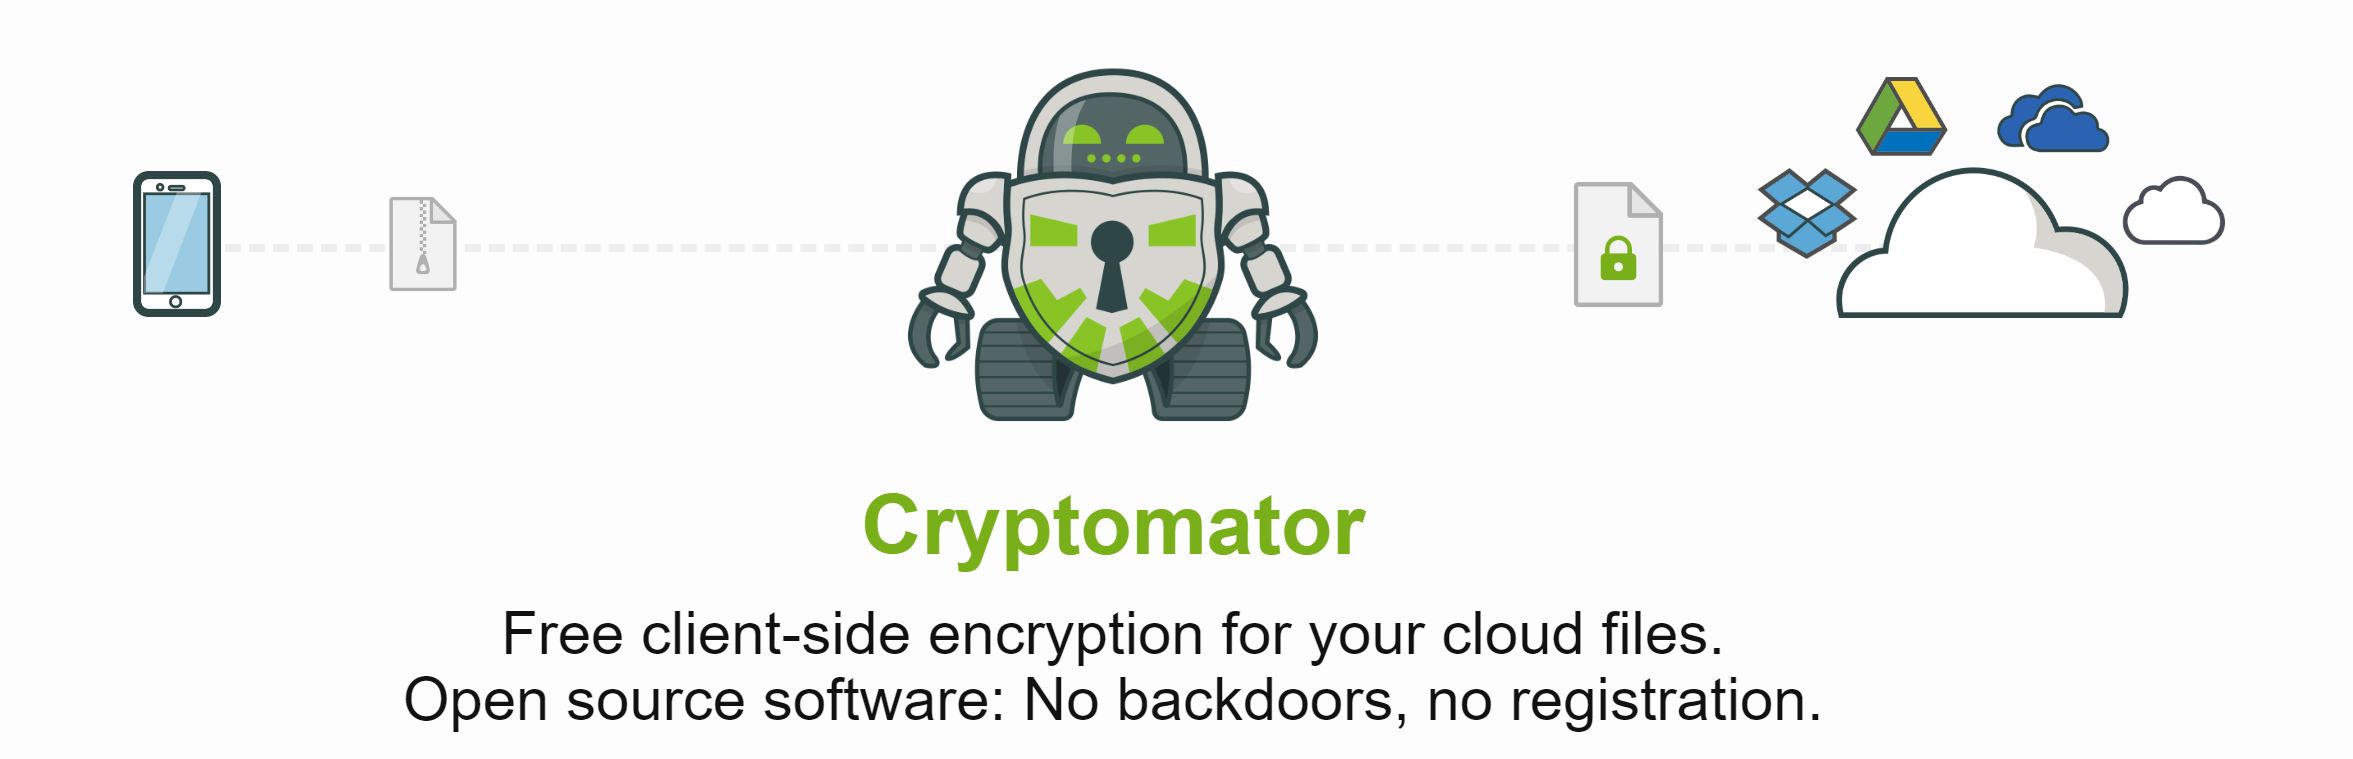
So our data are end-to-end encrypted with Cryptomator – an open source, AES encryption software package, with apps for Linux, Windows and Android (we use all three) – and even apps for IOS for those that like their Apples too (we don’t).

Of course, one of the things that makes this system “inconvenient” is that it’s hard to access end-to-end cloud-encrypted files quickly.  On the server, they look like THIS:

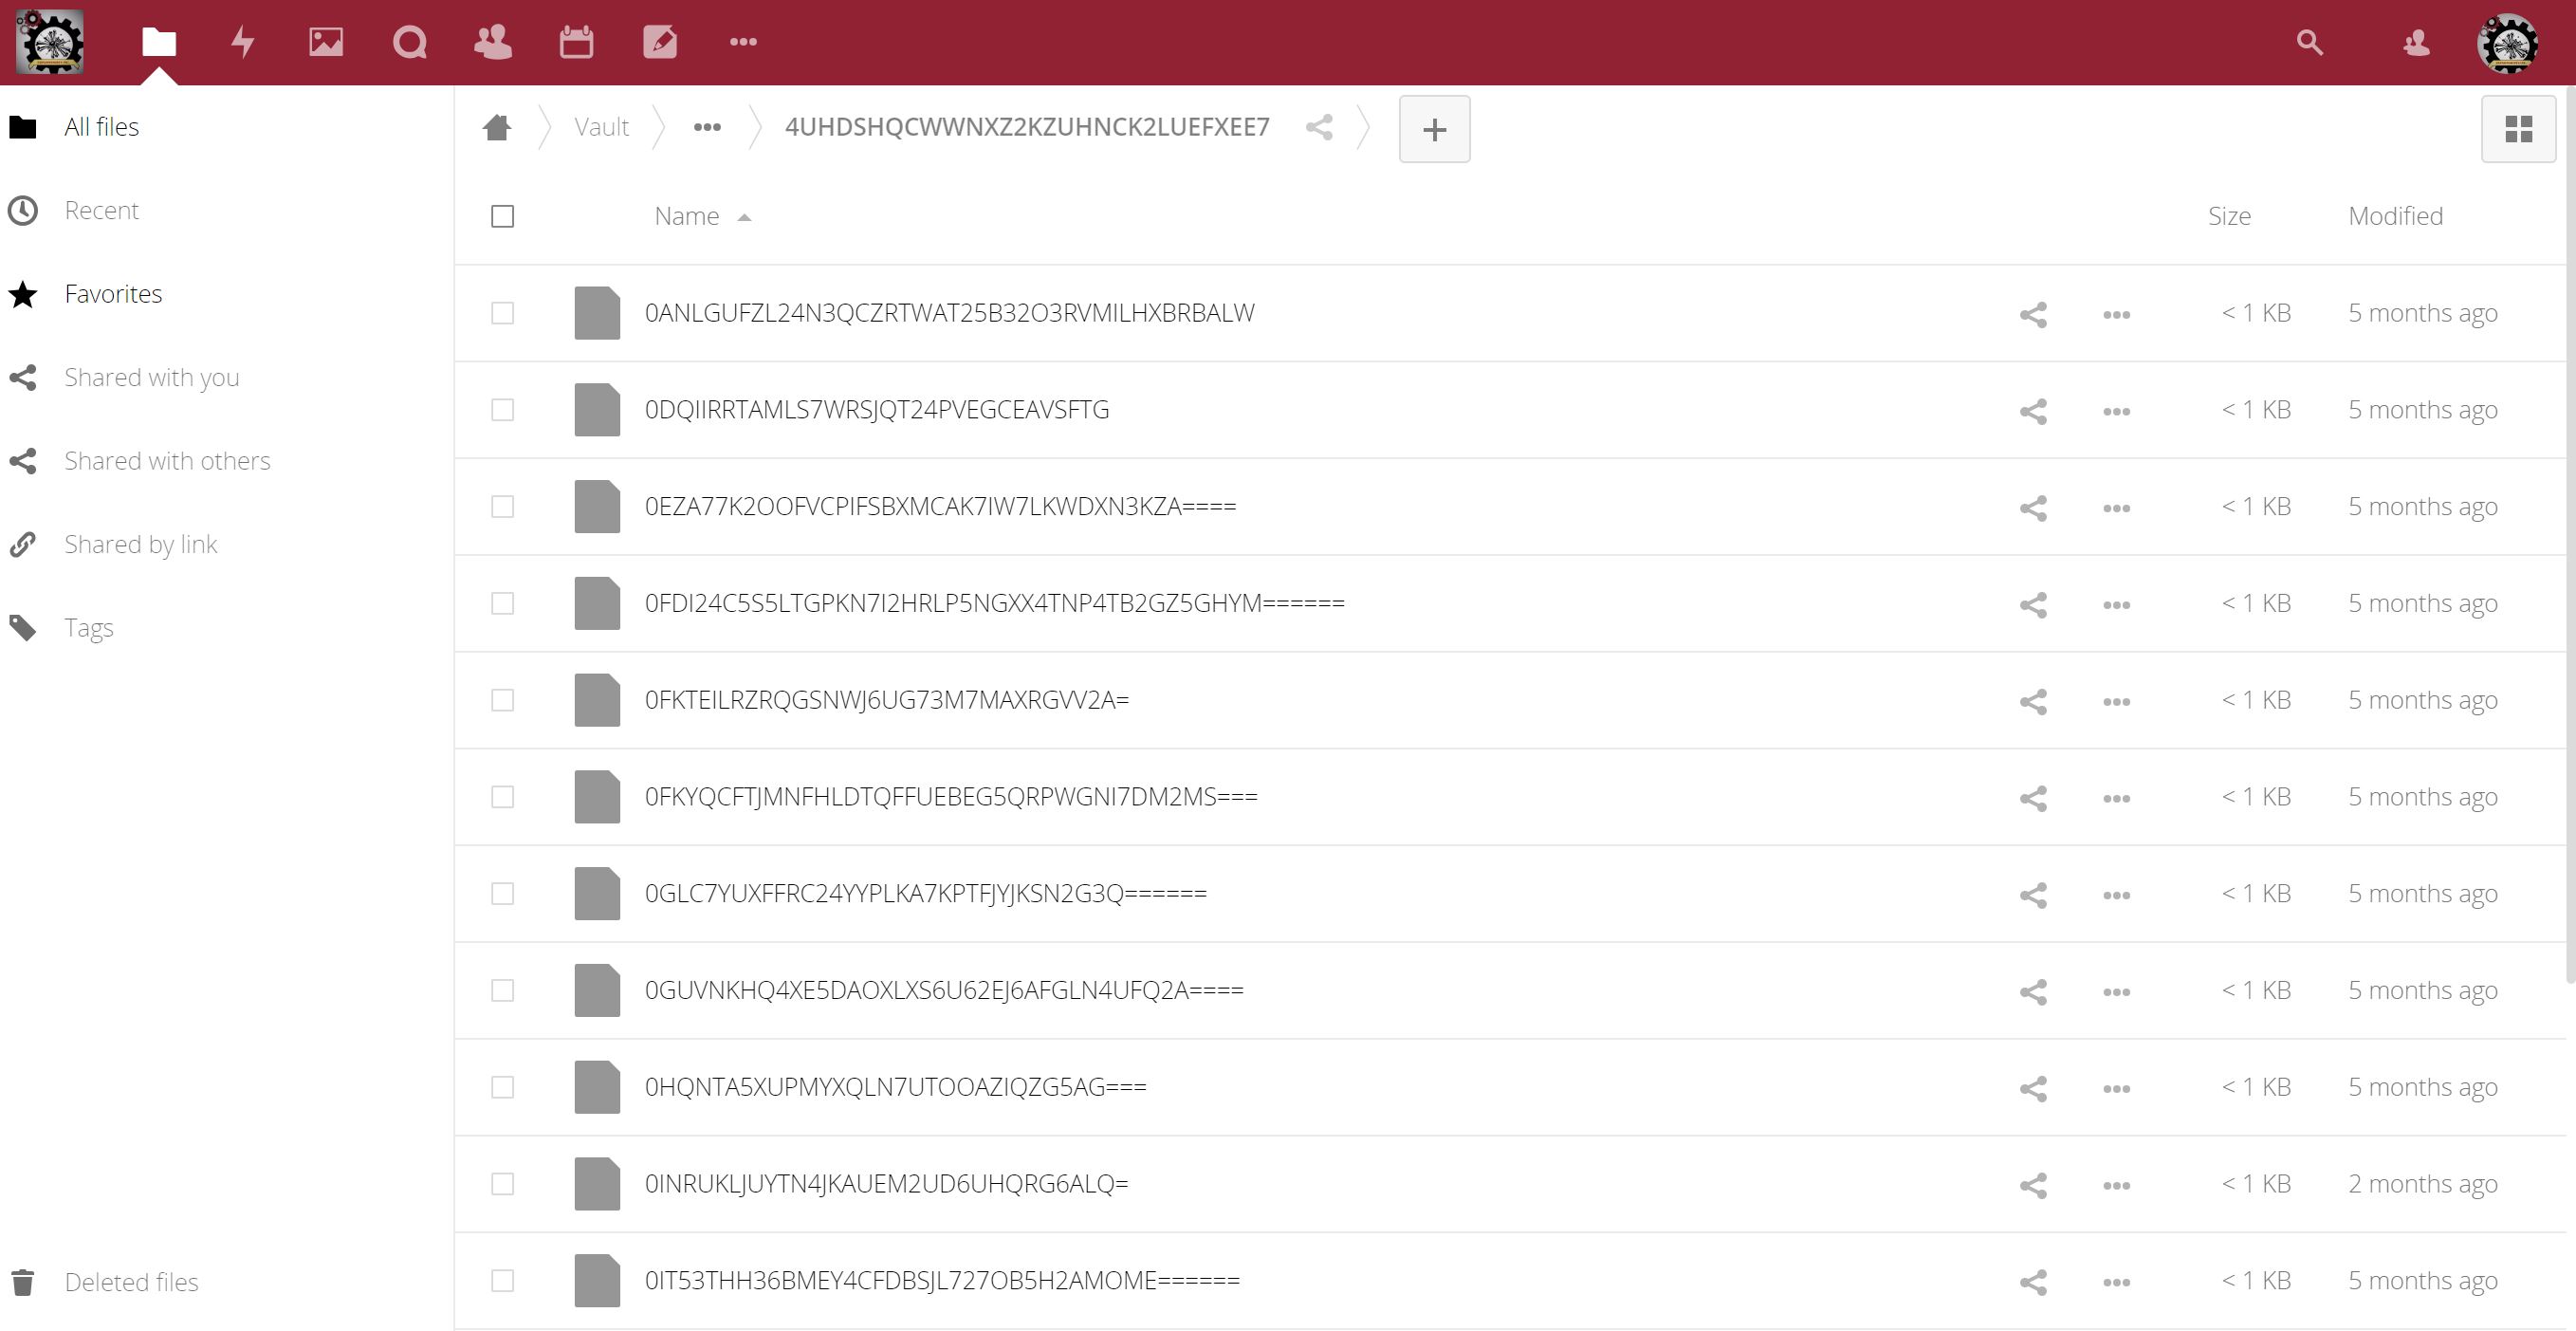
Not entirely useful.  Really hard to work on a file like this.  You have to  physically download your encrypted file(s) (say using the webdav sync software platform, like the great one provided by Nextcloud) and store them locally on your device, then decrypt them locally, on your device, so you can work on them.  This is fine when you are in your office, but what about when you are on the road (as we often are)?

Data residency and security issues can arise with this method of working when on travel, so you can’t download files en-mass to your device and decrypt them all when you are in the “wrong place”.  You have to wait until you can get back to a right location before you can work.  Customers don’t really like the delays this can cause them, and we don’t blame them.  And worse still, in that situation, even when you are done, you have to delete (or even ERASE) files on your PC if you are going back on travel etc. again to a location where data residency becomes an issue.  Then when you get to a secure location again, you have to repeat this entire process for working on your files again. This is hard to do.  Believe us, we know, as we have had to do this, but we now have a better way.

A more secure but LESS CONVENIENT way is to somehow only download the files you need as you need them, and decrypt and work on them etc.  ONLY AS YOU NEED THEM.   This is more secure, as you only have one decrypted file on your device (the one you are working on in your word processor etc), but how can that be done and be done CONVENIENTLY?

Obviously, this “convenience v security” issue is one we have spent a lot of time looking at.  We have used webdavs connected to our cloud servers and tried to selectively sync folder(s).  It’s not efficient, not pretty, not fast (actually really slow) and sometimes it just doesn’t work.

But thankfully we now have a much faster, reliable, efficient, effective yet totally compliant way of addressing the problem of keeping files end-to-end encrypted yet still be able to work on them ONE AT A TIME even when you are in a location that can otherwise bring data residency issues.

For us, this requires several systems that have to work together, but they are built (mostly) on Open Source software that has, in some cases, been tried and tested for many years so is probably as good as you can get today:

  • OpenSSH – for Secure Shell connectivity;
  • Nextcloud server;
  • Nextcloud sync clients;
  • Cryptomator;
  • 2FA Authentication credential management apps;
  • And last but not least…Mountain Duck.

SSH is an established, reliable secure service used globally to securely connect to servers.  If configured correctly, they are very reliable.  We believe ours are configured properly and hardened, not least because NONE of our SSH connections work with a username/password login.  Every connection requires a strong public/private key combination, and every key itself is further password protected; and, each SSH connection ALSO requires a second-factor (2FA) code.  We think that’s pretty good.  We have already explained Nextcloud and Cryptomator.  2FA apps are the apps that generate the six-digit code that changes on your phone every 30 seconds.  We have written about a new one we like (PIN protected), so we won’t go into that anymore.  That leaves ‘Mountain Duck’.  Yes ‘Mountain Duck‘.  We know, it’s not a name one naturally gives to a secure file-access system, but bear with us (and in any case, we didn’t name it!).  Put simply, Mountain duck allows us to use our 2FA protected SSH connections to our servers to access our files, but it does so in a really neat way:

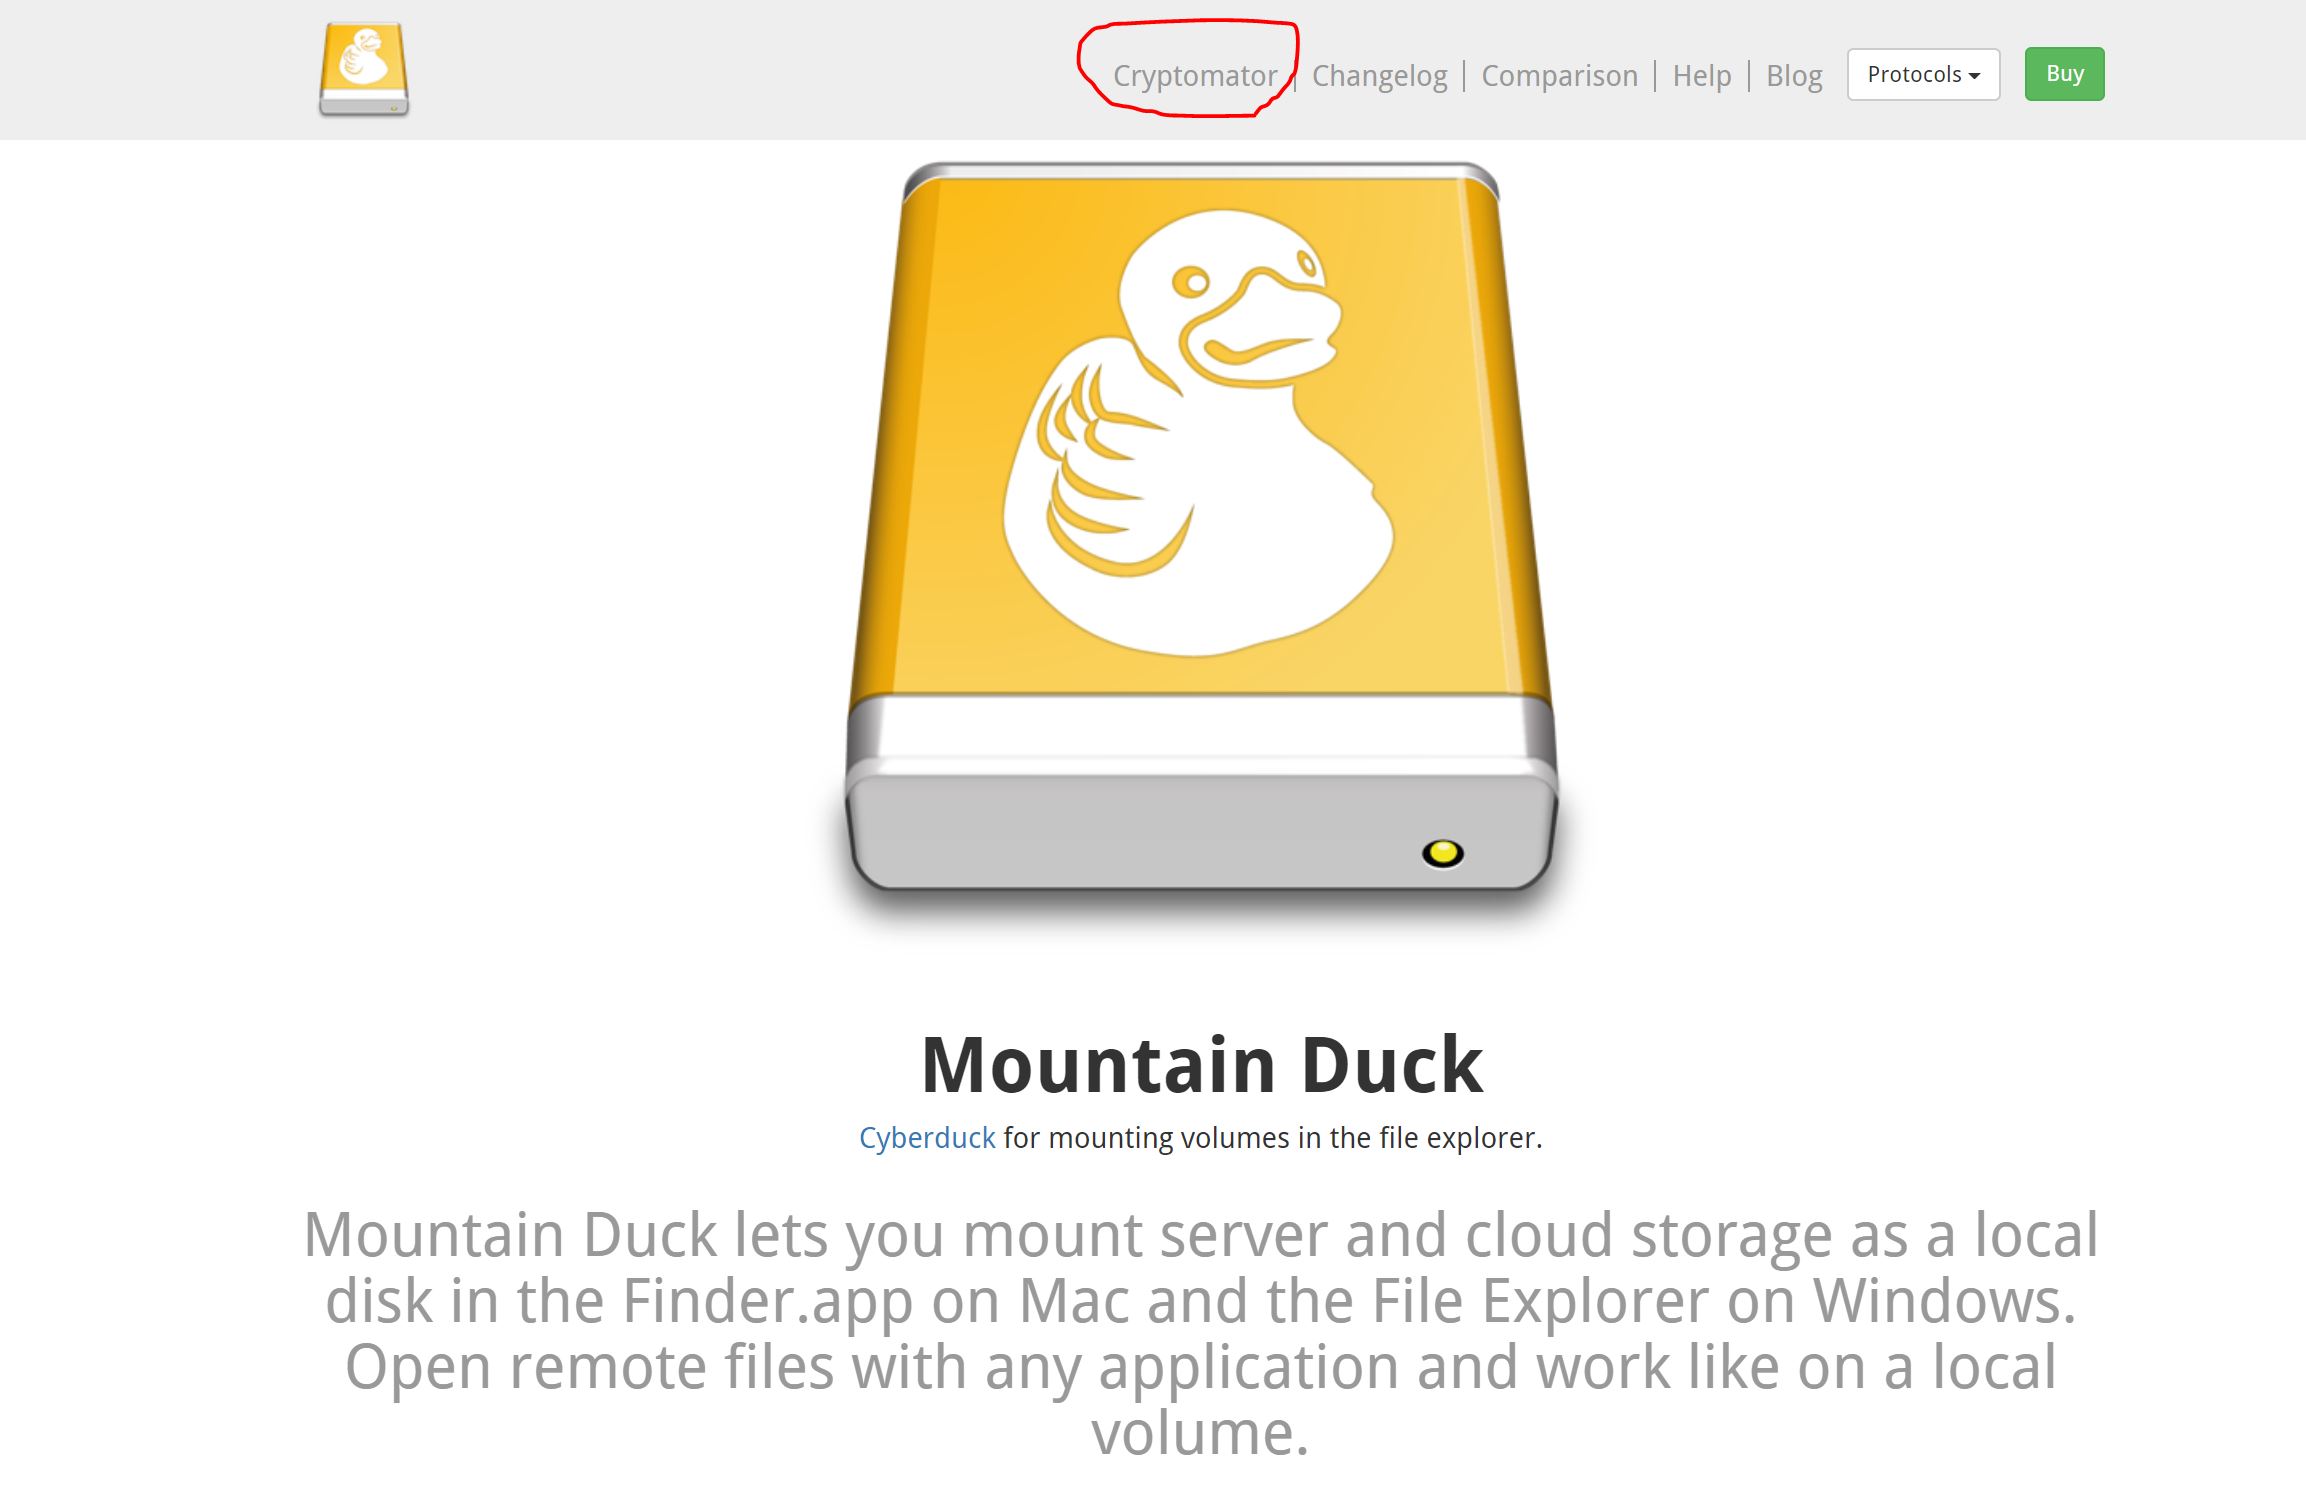
In the image above, taken from their we site, note the text we circled in red.  Mountain Duck comes with CRYPTOMATOR integration.  So this effectively makes Mountain Duck a ‘Windows explorer’ that can be 2FA-connected via SSH to a server to access and decrypt in real-time Cryptomator end-to-end encrypted files stored on our HQ-based servers.  To that, we say:

Just WOW.

So how does this work in the real world; how do we use this?

Well we have a Nextcloud sync client that syncs each users files to a separate LXC container running on the corporate server.  Each container is used to sync the users files between the Nextcloud server and the Nextcloud user files.  Both the Nextcloud server AND the Nextcloud client files are ultimately stored in the HQ facilities, albeit in very different LXC containers.  Files are end-to-end encrypted in both the Nextcloud server and the Nextcloud client container.  All are further protected by full disk encryption and SSL/TLS connectivity.

Whether we are on the road OR in the office, we work on our files by logging into our Nextcloud client container using OpenSSH and Mountain Duck.

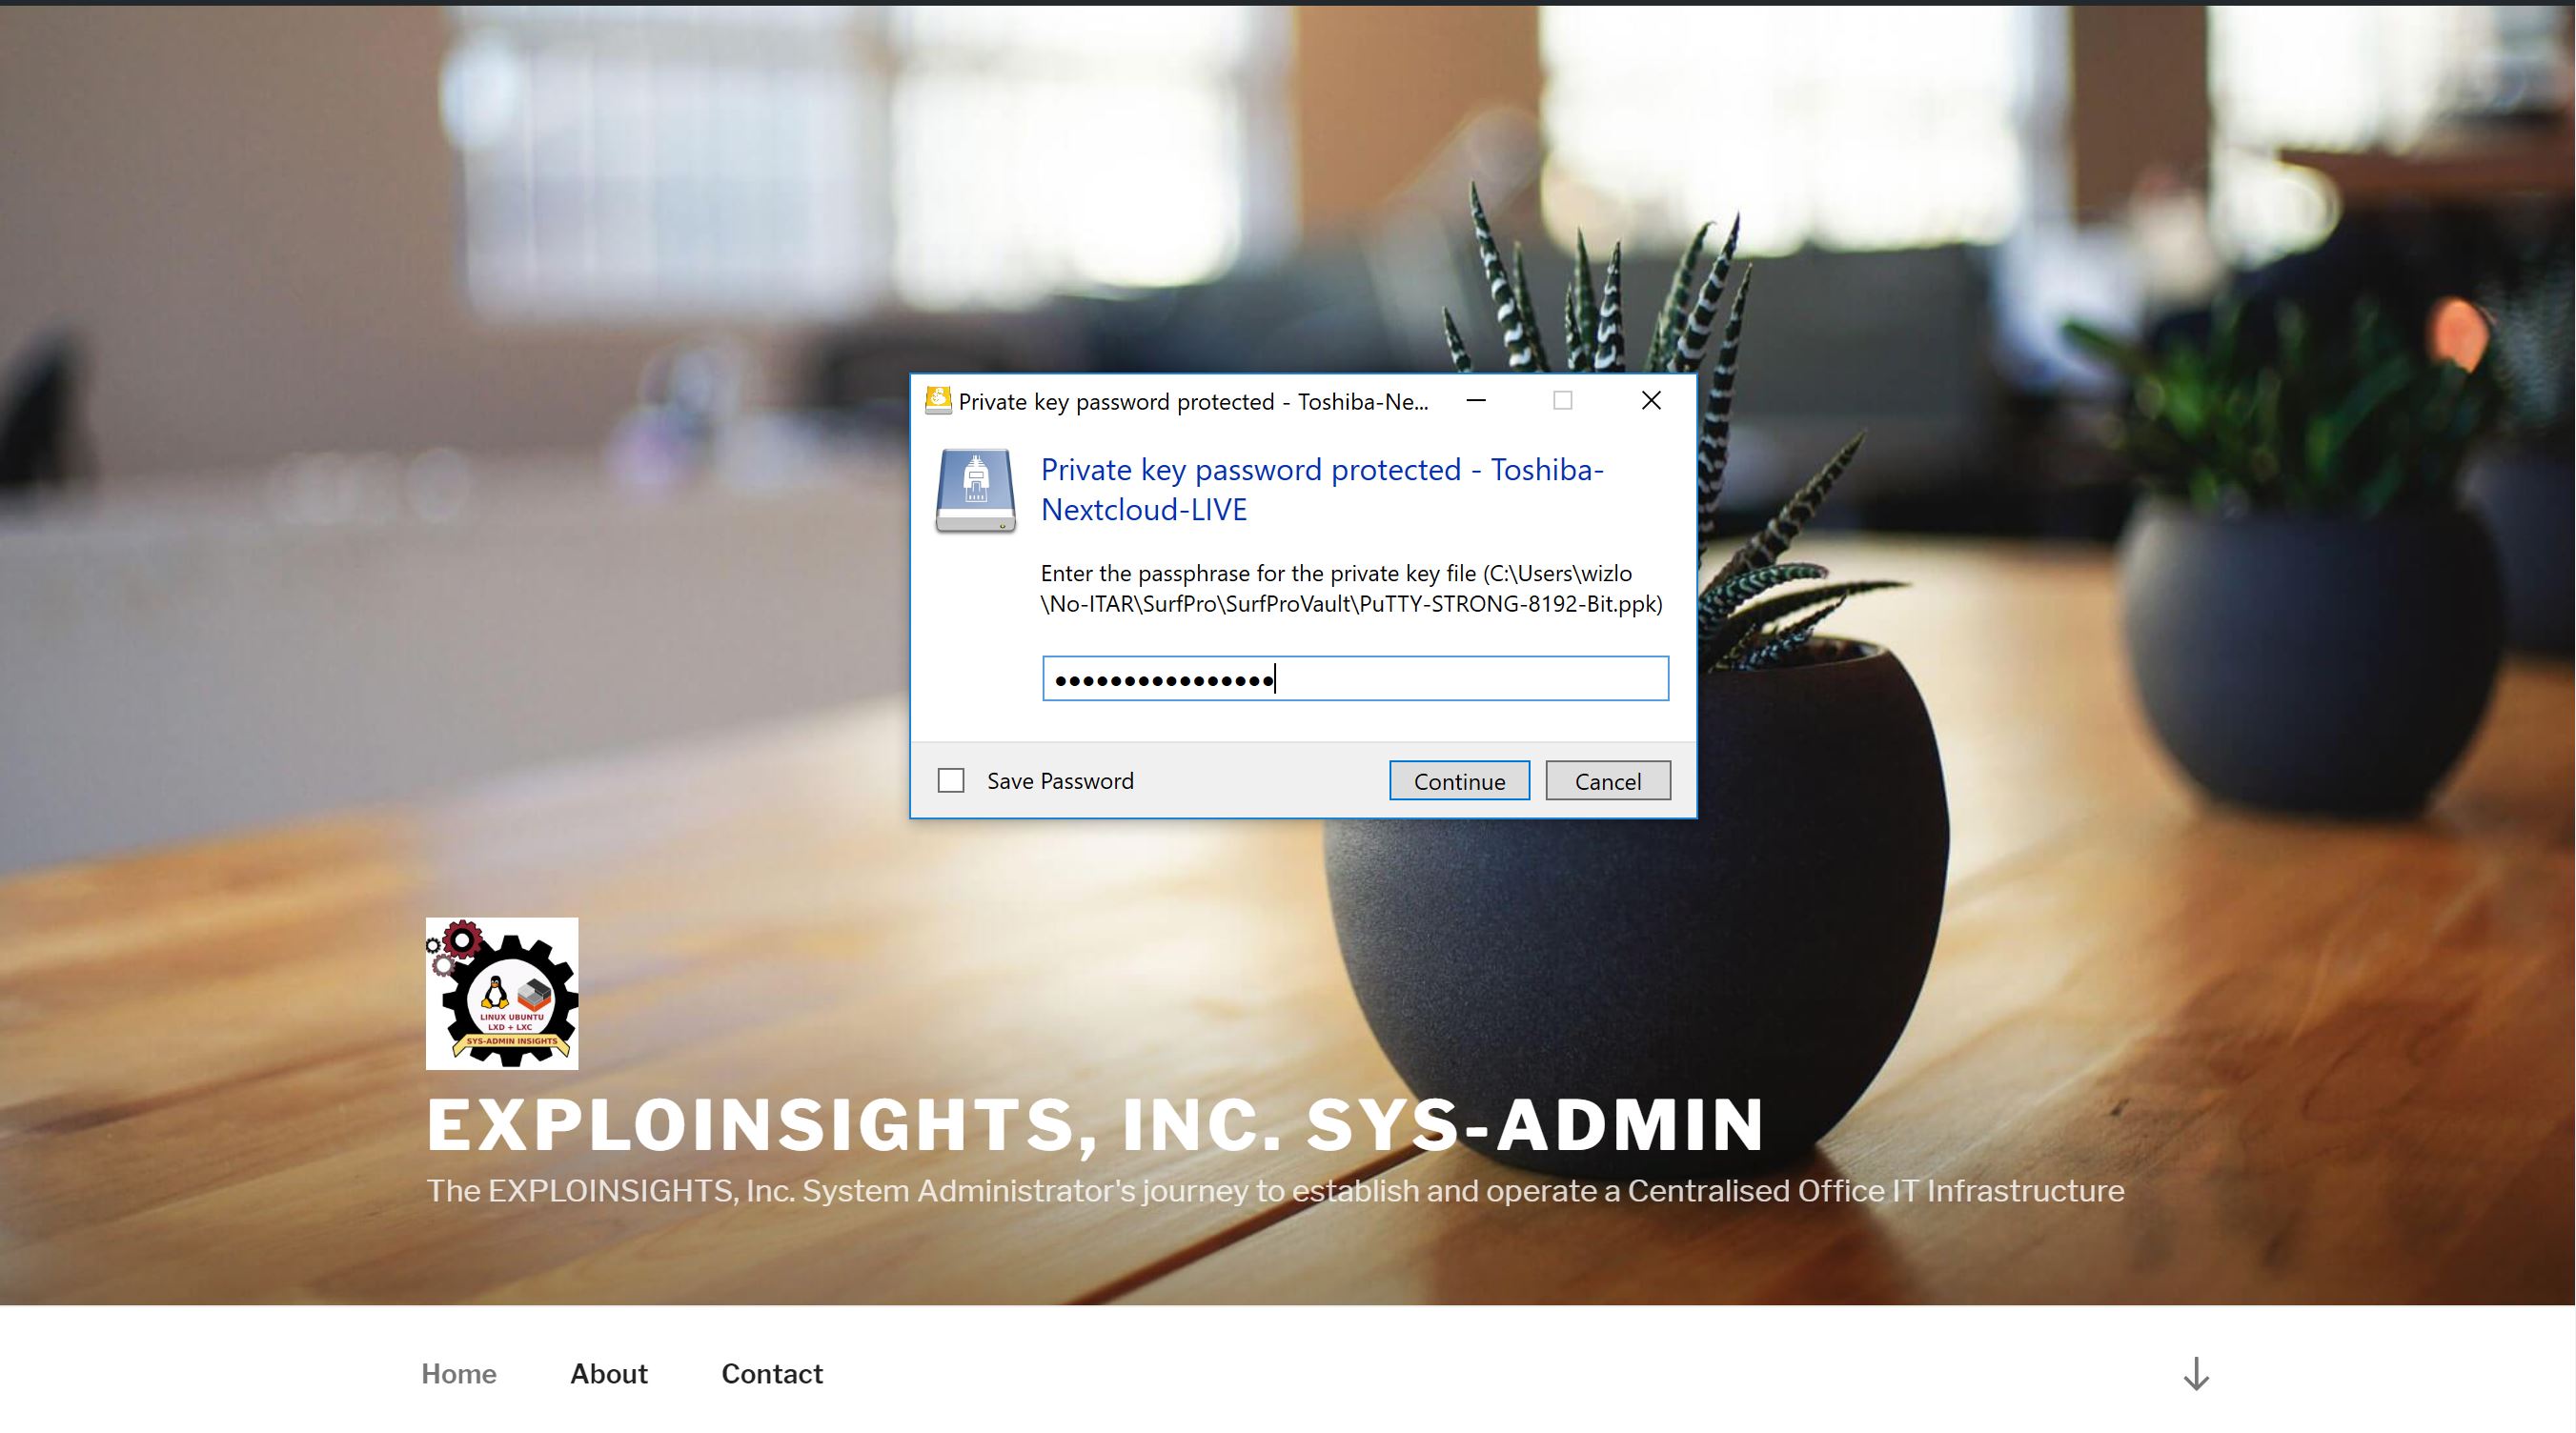
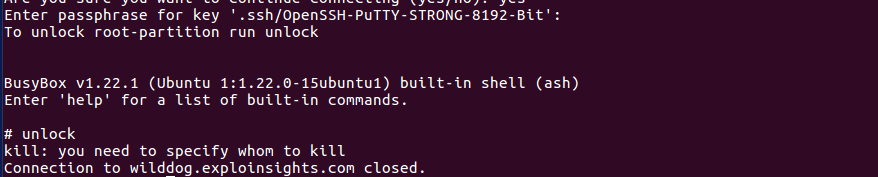
It’s all a lot simpler than it might sound:  First, we connect to our Nextcloud client containers via strong SSH credentials via Mountain Duck’s friendly interface, which asks first for our private key password:

And then asks for our 2FA code:

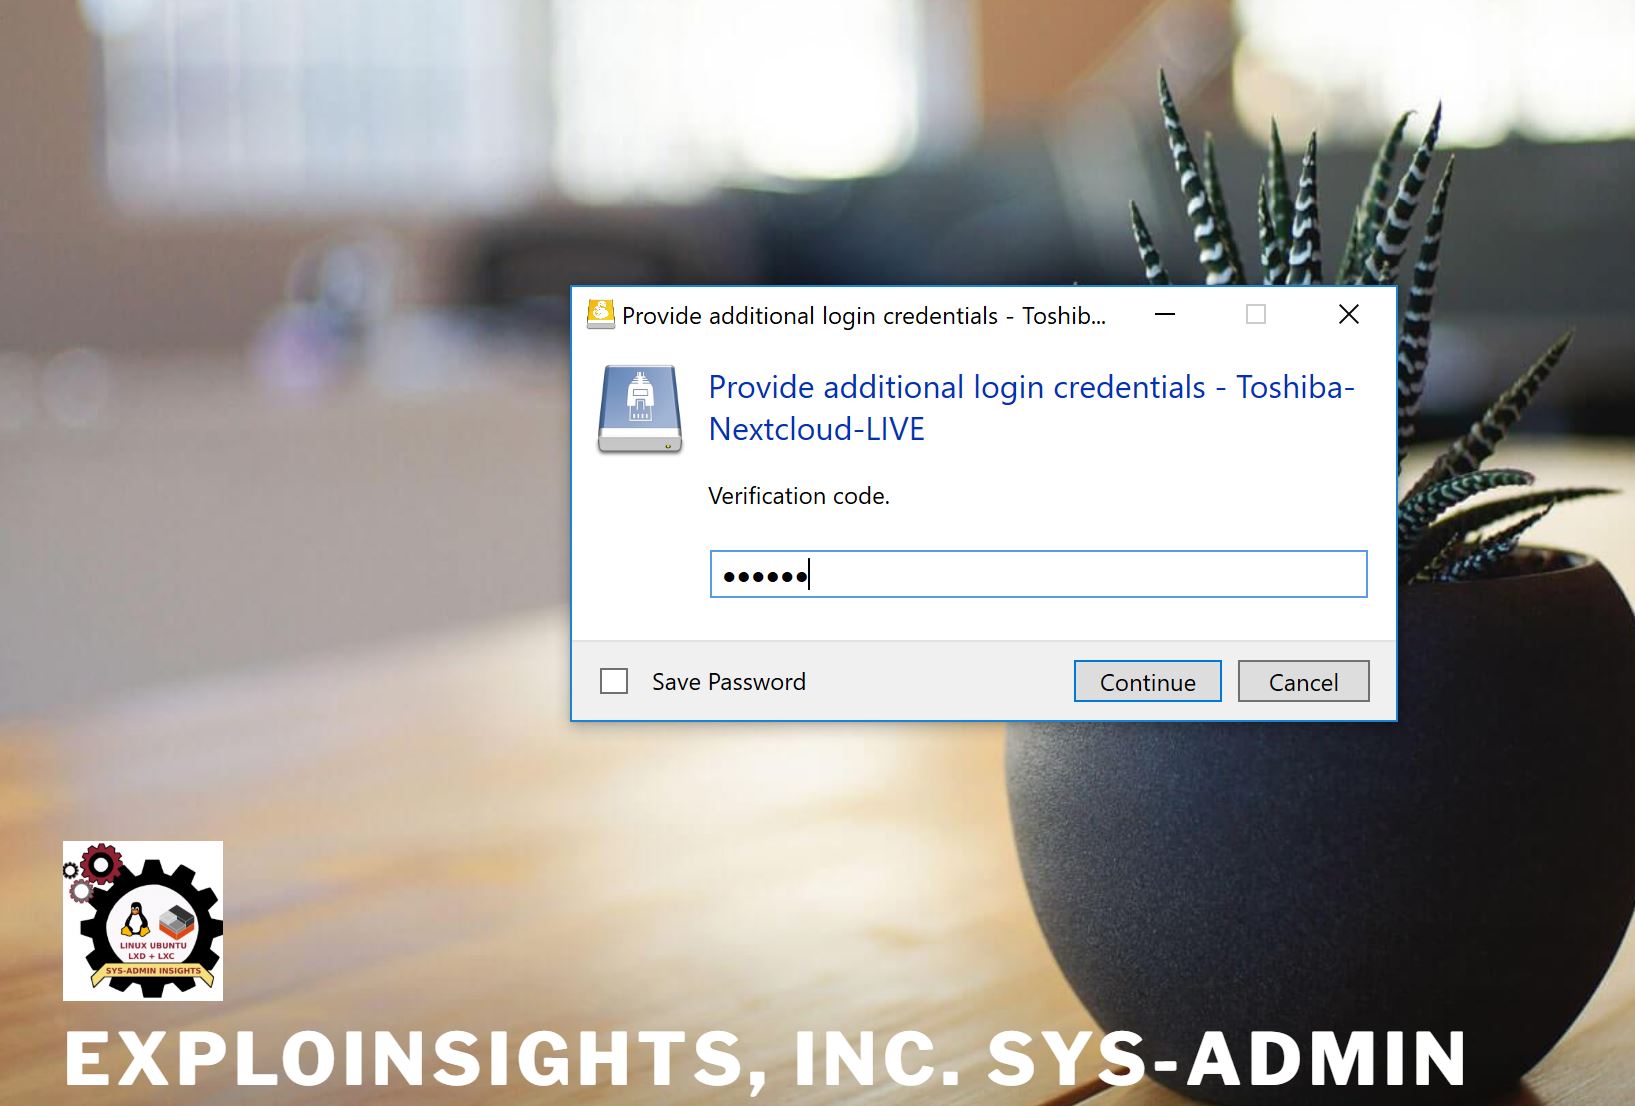
The 2FA code is generated on an our 2FA App on our encrypted, locked android smartphone, in a PIN protected app (We use ‘Protectimus‘ and also ‘andOTP‘).

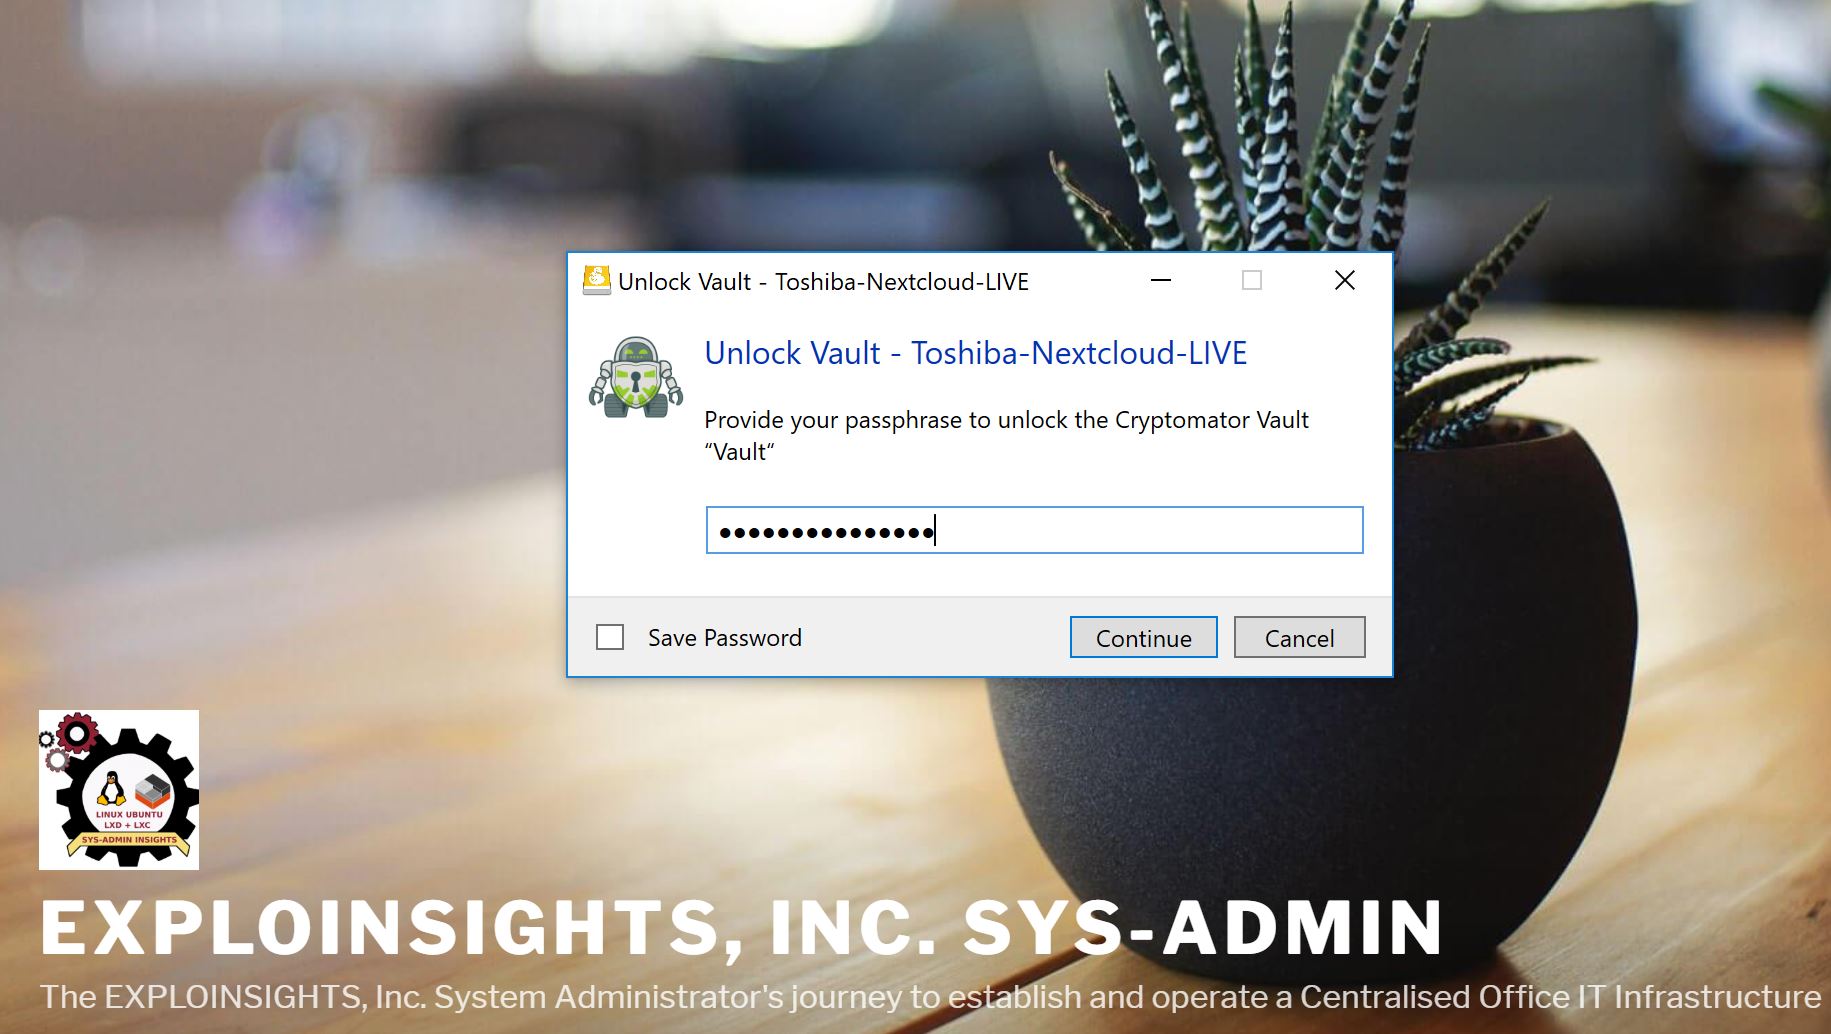
With these credentials, Mountain Duck logs into our Nextcloud client container via the secure SSH connection, and then it accesses our end-to-end encrypted files but in doing so, it automatically detects our Cryptomator Vault (because it’s built into Mountain Duck) And it then allows us (if we want) to UNLOCK our Cryptomator Vault and access it:

So in one operation and three “codes”, we can securely connect to our Nextcloud client container via secure SSH and access our end-to-end encrypted files from anywhere in the world (where there’s internet!).

And Mountain Duck makes this easier because it allows you to bookmark the connection: open Mountain Duck and click a bookmark to the SSH server then enter your SSH password/2FA code.  Mountain Duck logs into your server and accesses the files located there.  It can even remember your passwords if you want (we don’t do that, as we don’t trust Windows much at all), but you could configure this to JUST require a 2FA code if you want.

The whole process takes, maybe, 30 seconds including the time to get the phone out and obtain a 2FA code.  Not bad!  And once you have done that, you can work on your END TO END encrypted files stored on your office based Nextcloud client container files from anywhere in the world.  No files are needed to be on your PC – in the office or on the road.  Everything remains solidly encrypted so if you do get hacked, there are no readable data that can be stolen, so at least that threat is low.  And everything is going through modern, secure OpenSSH transfer protocols, which in our case, makes us sleep a lot better than having some proprietary code with back-doors and all sorts of unpleasant surprises that always seem to arise.

The catch?  Well, you do need internet connectivity or you can do NOTHING on your data.  The risk in the office is low, but when your on the road it does happen, so it’s still not perfect. 🙂

Also, you do have to set this stuff up with some poor SysAdmin.  But if we can do it, probably anyone can?

Finally, this is what it looks like for real after we go through that hard-to-explain-but-easy-to-do login.  A window appears and you can see your files just like a normal file view on your Windows PC.

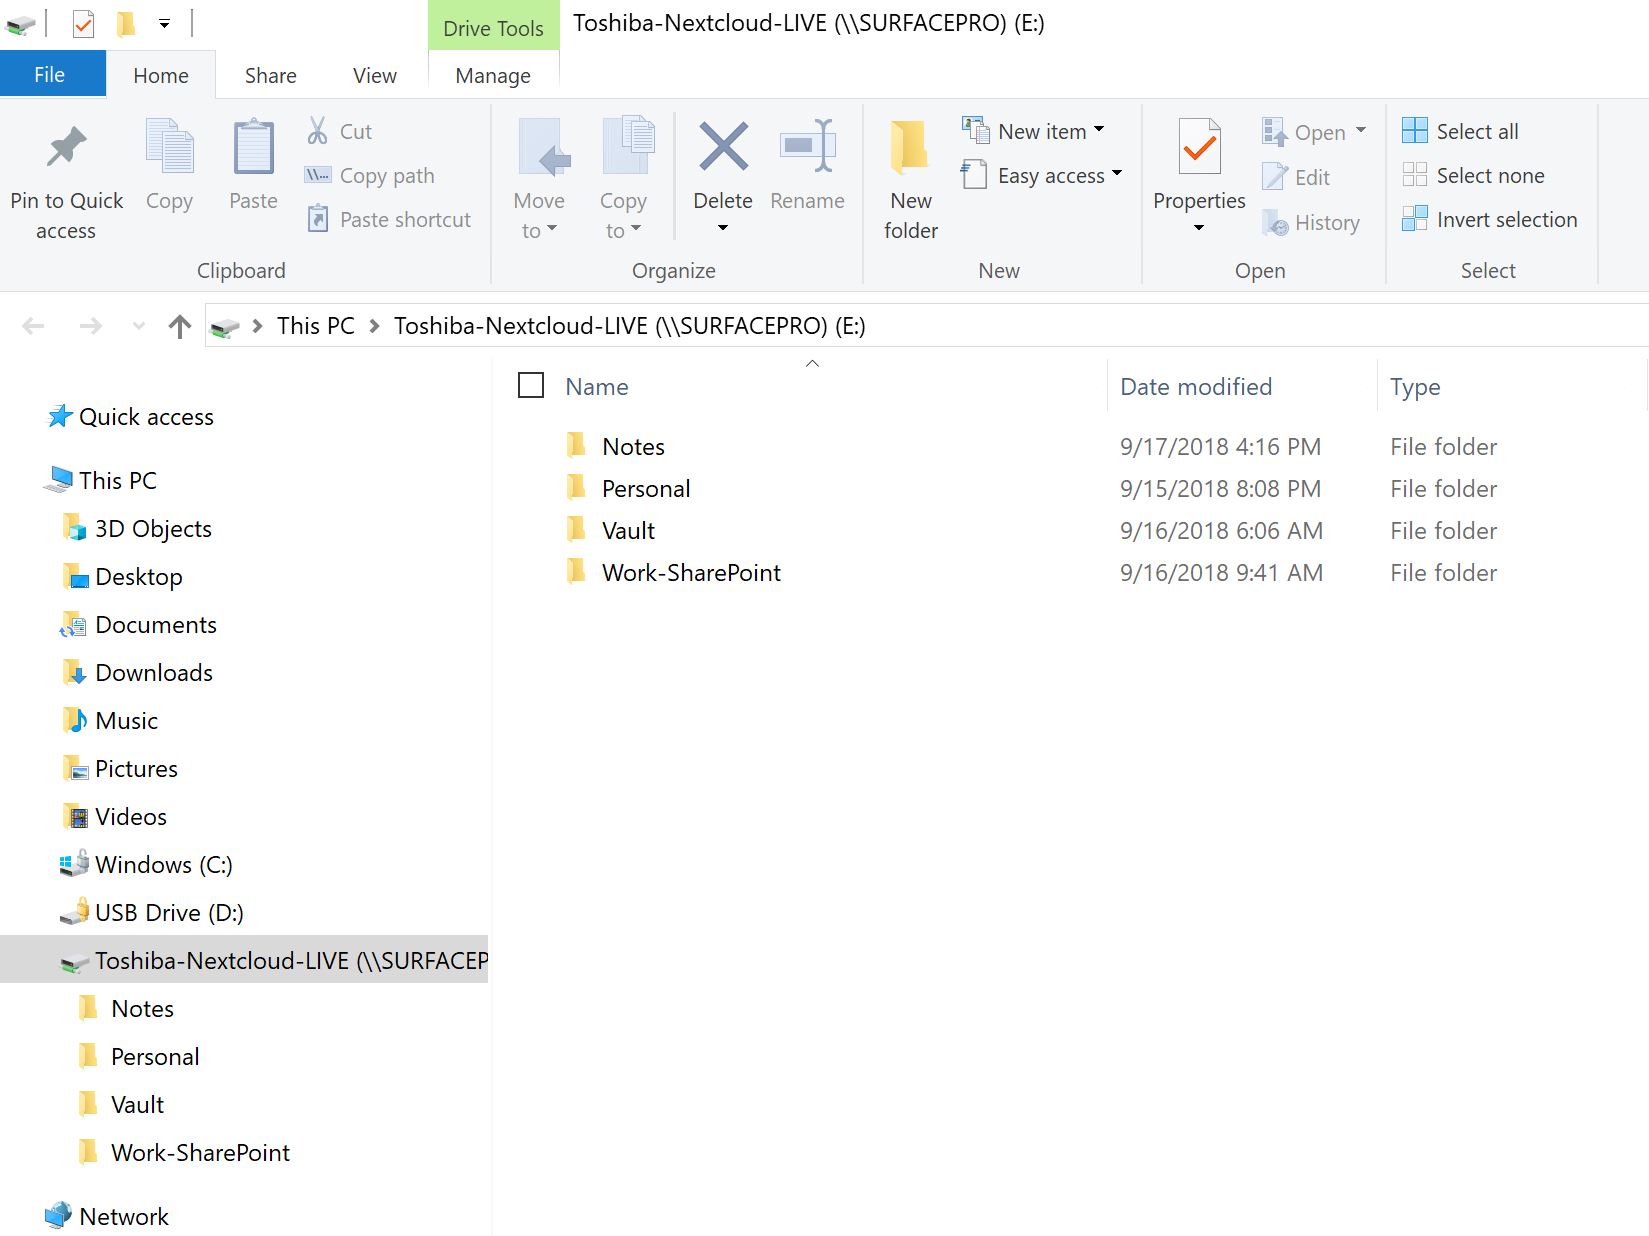
Above is a regular Windows Explorer window, accessing the Nextcloud client container files via fast and secure SSH.  The folder ‘Vault’ is actually a Cryptomator end-to-end encrypted folder, but because we have entered the credentials (above), it can be accessed like any other.  Files inside can be copied, edited, saved, shared, printed etc. just as files in the other folders.  It’s totally transparent, and it’s TOTALLY AWESOME.  The files in the Nextcloud client container (and the Nextcloud server) remain fully encrypted all the time.  A file ONLY gets decrypted when it’s selected and downloaded by the user.  Viewing a file in explorer (as in the view above) does NOT decrypt it – you have to double-click etc. the file to initiate downloading and decryption.  All your changes get immediately sync’d to the Nextcloud client container (which immediately sync’s everything back to the server).  Nothing gets stored on the PC you are using to work on your files unless you deliberately save it to the device.

So, THIS is how WE roll our own end-to-end encrypted data storage.  How do you do yours?

questions or comments by email only [email protected]


Simple Folder copy using rsync over ssh

So sometimes you have a folder on one machine that you just need on another one.

We are GREAT FANS of ssh, and we think it’s a perfect secure tunnel for performing such operations.  So the question asked was how do you synchronise /path/to/folder  on the local machine to a remote machine using:

  1. Linux Ubuntu
  2. SSH
  3. A private SSH keyfile
  4. Over a non-standard SSH port

Well, since this linux, it’s actually rather boringly easy:

rsync -r -a -v -e 'ssh -p12345 -i .ssh/rsa-keyfile' /path/to/folder [email protected]:/home/username/path/to

This copies (if necessarily CREATING) ‘folder’ on the local machine to our remote one.  There are however some very important details.

Do NOT add a training ‘/’ to the paths if you want rsync to automatically create the directories.  So use this:

/path/to/folder   [email protected]:/home/uname/path/to

Not this:

/path/to/folder/   [email protected]:/home/uname/path/to/

The latter copies the files (and sub-directories) in /path/to/folder, whereas the former copies the folder, its contents and all its sub-directories, and thus creates the directory ‘folder’ at the remote machine if it does not exist.

Happy rsync’ing


Why LXC

We deploy LXC containers in quite literally ALL of our production services.  And we have several development services, ALL of which are in LXC containers.

Why is that?  Why do we use LXC?

The truthful answer is “because we are not Linux experts”.  It really is true.  Almost embarrassingly so in fact.  Truth is, the SUDO command scares us: it’s SO POWERFUL that you can even brick a device with it (we know.  We did it).

We have tried to use single machines to host services.  It takes very little resources to run a Linux server, and even today’s laptops have more than enough hardware to support even a mid-size business (and we are not even mid-size).  The problem we faced was that whenever we tried “sudo” commands in Linux Ubuntu, something at sometime would go wrong – and we were always left wondering if we had somehow created a security weakness, or some other deficiency.  Damn you, SuperUser, for giving us the ability to break a machine in so many ways.

We kept re-installing the Linux OS on the machines and re-trying until we were exhausted.  We just could not feel COMFORTABLE messing around with an OS that was already busy dealing with the pervasive malware and hacker threats, without us unwittingly screwing up the system in new and novel ways.

And that’s when the light went on.  We thought: what if we could type in commands without worrying about consequences?  A world where anything goes at the command line is…heaven…for those that don’t know everything there is to know about Linux (which of course definitely includes us!).  On that day, we (re-) discovered “virtual machines”.  And LXC is, in our view, the BEST, if you are running a linux server.

LXC allows us to create virtual machines that use fewer resources than the host; machines that run as fast as bare-metal servers (actually, we have measured them to be even FASTER!).  But more than that, LXC with its incredibly powerful “snapshot” capability allows us to play GOD at the command line, and not worry about the consequences.

Because of LXC, we explore new capabilities all the time – looking at this new opensource project, or that new capability.  And we ALWAYS ALWAYS run it in an unprivileged LXC container (even if we have to work at it) because we can then sleep at night.

We found the following blog INCREDIBLY USEFUL – it inspired us to use LXC, and it gives “us mortals” here at Exploinsights, Inc. more than enough information to get started and become courageous with a command line!  And in our case, we have never looked back.  We ONLY EVER use LXC for our production services:

LXC 1.0: Blog post series [0/10]

We thank #UBUNTU and we thank #Stéphane Graber for the excellent LXC and the excellent development/tutorials respectively.

If you have EVER struggled to use Linux.  If the command line with “sudo” scares you (as it really should).  If you want god-like forgiveness for your efforts to create linux-based services (which are BRILLIANT when done right) then do yourself a favor: check out LXC at the above links on a clean Ubuntu server install.  (And no, we don’t get paid to say that).

We use LXC to run our own Nextcloud server (a life saver in our industry).  We operate TWO web sites (each in their own container), a superb self-hosted OnlyOffice document server and a front-end web proxy that sends the traffic to the right place.  Every service is self-CONTAINED in an LXC container.  No worries!

Other forms of virtualisation are also good, probably.  But if you know of anything as FAST and as GOOD as LXC…then, well, we are surprised and delighted for you.

Regards,

SysAdmin ([email protected])


Interactively Updating LXC containers

We love our LXC containers.  They make it so easy to provide and update services – snapshots take most of the fear out of the process, as we have discussed previously here.  But even so, we are instinctively lazy and are always looking for ways to make updates EASIER.  Now it’s possible to fully automate the updating of a running service in an LXC container BUT a responsible administrator wants to know what’s going on when key applications are being updated.  We created a compromise, a simple script that runs an interactive process to backup and update our containers.  It saves us repetitively typing the same commands, but it still keeps us fully in control as we answer yes/no upgrade related questions.  We thought our script is worth sharing.  So, without further ado, here’s our script, which you can just copy and paste to a file in your home directory (called say ‘update-containers.sh’).  Then just run the script when you want to update and upgrade your containers.  Don’t forget to change the name(s) of your linux containers in the ‘names=…’ line of the script:

#!/bin/bash
#
# Simple Container Update Script
# Interactively update lxc containers

# Change THESE ENTRIES with container names and remote path:
#
names='container-name-1 c-name2 c-name3 name4 nameN'

# Now we just run a loop until all containers are backed up & updated
#
for name in $names
do
echo ""
echo "Creating a Snapshot of container:" $name
lxc snapshot $name
echo "Updating container:" $name
lxc exec $name apt update
lxc exec $name apt upgrade
lxc exec $name apt autoremove
echo "Container updated. Re-starting..."
lxc restart $name
echo ""
done
echo "All containers updated"

Also, after you save it, don’t forget to chmod the file if you run it as a regular script:

chmod +x container-update.sh

Now run the script:

./container-update

Note – no need to run using ‘sudo’ i.e. as ROOT user- this is LXC, we like to be run with minimal privileges so as not to ever break anything important!

So this simple script, which runs in Ubuntu or equivalex distro, does the following INTERACTIVELY for every container you name:

lxc snapshot container #Make a full backup, in case the update fails
apt update             #Update the repositories
apt upgrade            #Upgrade everything possible
apt autoremove         #Free up space by deleting old files 
restart container      #Make changes take effect

This process is repeated for every container that is named.  The ‘lxc snapshot’ is very useful: sometimes an ‘apt upgrade’ breaks the system.  In our case, we can then EASILY restore the container to its prior updated state using the ‘lxc restore command.  All you have to do is firstly find out a containers snapshot name:

lxc info container-name

E.g. – here’s the output of ‘lxc info’ on one of our real live containers:

sysadmin@server1:~lxc info office

Name: office
Remote: unix://
Architecture: x86_64
Created: 2018/07/24 07:02 UTC
Status: Running
Type: persistent
Profiles: default
Pid: 21139
Ips:
eth0: inet 192.168.1.28
eth0: inet6 fe80::216:3eff:feab:4453
lo: inet 127.0.0.1
lo: inet6 ::1
Resources:
Processes: 198
Disk usage:
root: 1.71GB
Memory usage:
Memory (current): 301.40MB
Memory (peak): 376.90MB
Network usage:
eth0:
Bytes received: 2.52MB
Bytes sent: 1.12MB
Packets received: 32258
Packets sent: 16224
lo:
Bytes received: 2.81MB
Bytes sent: 2.81MB
Packets received: 18614
Packets sent: 18614
Snapshots:
http-works (taken at 2018/07/24 07:07 UTC) (stateless)
https-works (taken at 2018/07/24 09:59 UTC) (stateless)
snap1 (taken at 2018/08/07 07:37 UTC) (stateless)

The snapshots are listed at the end of the info screen.  This container has three: the most recent being called ‘snap1’.  We can restore our container to that state by issuing:

lxc restore office snap1

…and then we have our container back just where it was before we tried (and hypothetically failed) to update it.   So we could do more investigating to find out what’s breaking and then take corrective action.

The rest of the script is boiler-plate linux updating on Ubuntu, but it’s interactive in that you still have to accept proposed upgrade(s) – we call that “responsible upgrading”.  Finally, each container is restarted so that the correct changes are propagated.  This gives a BRIEF downtime of each container (typically 1-several seconds).  Don’t do this if you cannot afford even a few seconds of downtime.

We run this script manually once a week or so, and it makes the whole container update process less-painful and thus EASIER.

Happy LXC container updating!

Installing OnlyOffice Document Server in an Ubuntu 16.04 LXC Container

In our quest to migrate away from the relentlessly privacy-mining Microsoft products, we have discovered ‘OnlyOffice’ – a very Microsoft-compatible document editing suite.  Onlyoffice have Desktop and server-based versions, including an Open Source self-hosted version, which scratches a LOT of itches for Exploinsights, Inc for NIST-800-171 compliance and data-residency requirements.

If you’ve ever tried to install the open-source self-hosted OnlyOffice document server (e.g. using the official installation instructions here) you may find it’s not as simple as you’d like.  Firstly, per the official instructions, the onlyoffice server needs to be installed on a separate machine.  You can of course use a dedicated server, but we found that for our application, this is a poor use of resources as our usage is relatively low (so why have a physical machine sitting idly for most of the time?).  If you try to install onlyoffice on a machine with other services to try to better utilise your hardware, you can quickly find all kinds of conflicts, as the onlyoffice server uses multiple services to function and things can get messed up very quickly, breaking a LOT of functionality on what could well be a critical asset you were using (before you broke it!).

Clearly, a good compromise is to use a Virtual Machine – and we like those a LOT here at Exploinsights, Inc.  Our preferred form of virtualisation is LXD/LXC because of performance – LXC is blindingly fast, so it minimizes user-experience lag issues.  There is however no official documentation for installing onlyoffice in an lxc container, and although it turns out to be not straightforward, it IS possible – and quite easy once you work through the issues.

This article is to help guide those who want to install onlyoffice document server in an LXC container, running under Ubuntu 16.04.  We have this running on a System76 Lemur Laptop.  The onlyoffice service is resource heavy, so you need a good supply of memory, cpu power and disk space.  We assume you have these covered.  For the record, the base OS we are running our lxc containers in is Ubuntu 16.04 server.

Pre-requisites:

You need a dns name for this service – a subdomain of your main url is fine.  So if you own “mybusiness.com”, a good server name could be “onlyoffice.mybusiness.com”.  Obviously you need dns records to point to the server we are about to create.  Also, your network router or reverse proxy needs to be configured to direct traffic for ports 80 and 443 to your soon-to-be-created onlyoffice server.

Instructions:

Create and launch a container, then enter the container to execute commands:

lxc launch ubuntu:16.04 onlyoffice
lxc exec onlyoffice bash

Now let’s start the installation.  Firstly, a mandatory update (follow any prompts that ask permission to install update(s)):

apt update && apt upgrade && apt autoremove

Then restart the container to make sure all changes take effect:

exit                     #Leave the container
lxc restart onlyoffice   #Restart it
lxc exec onlyoffice bash #Re-enter the container

Now, we must add an entry to the /etc/hosts file (lxc should really do this for us, but it doesn’t, and only office will not work unless we do this):

nano /etc/hosts  #edit the file

Adjust your file to change from something like this:

127.0.0.1 localhost

# The following lines are desirable for IPv6 capable hosts
::1 ip6-localhost ip6-loopback
fe00::0 ip6-localnet
ff00::0 ip6-mcastprefix
ff02::1 ip6-allnodes
ff02::2 ip6-allrouters
ff02::3 ip6-allhosts

To (see bold entry):

127.0.0.1 localhost
127.0.1.1 onlyoffice.mybusiness.com

# The following lines are desirable for IPv6 capable hosts
::1 ip6-localhost ip6-loopback
fe00::0 ip6-localnet
ff00::0 ip6-mcastprefix
ff02::1 ip6-allnodes
ff02::2 ip6-allrouters
ff02::3 ip6-allhosts

save and quit.  Now we install postgresql:

apt install postgresql

Now we have to do somethings a little differently than at a regular command line because we operate as a root user in lxc.  So we can create the database using these commands:

su - postgres

Then type:

psql
CREATE DATABASE onlyoffice;
CREATE USER onlyoffice WITH password 'onlyoffice';
GRANT ALL privileges ON DATABASE onlyoffice TO onlyoffice;
\q
exit

We should now have a database created and ready for use.  Now this:

curl -sL https://deb.nodesource.com/setup_6.x | bash -
apt install nodejs
apt install redis-server rabbitmq-server
echo "deb http://download.onlyoffice.com/repo/debian squeeze main" |  tee /etc/apt/sources.list.d/onlyoffice.list
apt-key adv --keyserver hkp://keyserver.ubuntu.com:80 --recv-keys CB2DE8E5
apt update

We are now ready to install the document server.  This is an EXCELLENT TIME to take  a snapshot of the lxc container:

exit
lxc snapshot onlyoffice pre-server-install

This creates a snapshot that we can EASILY restore another day.  And sadly, we probably have to as we have yet to find a way of UPDATING an existing document-server instance, so whenever onlyoffice release an update, we repeat the installation from this point forward after restoring the container configuration.

Let’s continue with the installation:

apt install onlyoffice-documentserver

You will be asked to enter the credentials for the database during the install.  Type the following and press enter:

onlyoffice

Once this is done, if you access your web site (i.e. your version of ‘www.onlyoffice.mybusiness.com’) you should see the following screen:

We now have a document server running, albeit in http mode only.  This is not good enough, we need to use SSL/TLS to make our server safe from eavesdroppers.  There’s a FREE way to do this using the EXCELLENT LetsEncrypt service, and this is how we do that:

Back to the command line in our lxc container.  Edit this file:

nano /etc/nginx/conf.d/onlyoffice-documentserver.conf

Delete everything there and change it to the following (changing your domain name accordingly):

include /etc/nginx/includes/onlyoffice-http.conf;
server {
  listen 0.0.0.0:80;
  listen [::]:80 default_server;
  server_name onlyoffice.mybusiness.com;
  server_tokens off;

  include /etc/nginx/includes/onlyoffice-documentserver-*.conf;

  location ~ /.well-known/acme-challenge {
        root /var/www/onlyoffice/;
        allow all;
  }
}

Save and quit the editor.  Then exeute:

systemctl reload nginx
apt install letsencrypt

And then this, changing the email address and domain name to yours:

letsencrypt certonly --webroot --agree-tos --email [email protected] -d onlyoffice.mybusiness.com -w /var/www/onlyoffice/

Now, we have to re-edit the nginx file”

nano /etc/nginx/conf.d/onlyoffice-documentserver.conf

…and replace the contents with the text below, changing all the bold items to your specific credentials:

include /etc/nginx/includes/onlyoffice-http.conf;
## Normal HTTP host
server {
  listen 0.0.0.0:80;
  listen [::]:80 default_server;
  server_name onlyoffice.mybusiness.com;
  server_tokens off;
  ## Redirects all traffic to the HTTPS host
  root /nowhere; ## root doesn't have to be a valid path since we are redirecting
  rewrite ^ https://$host$request_uri? permanent;
}
#HTTP host for internal services
server {
  listen 127.0.0.1:80;
  listen [::1]:80;
  server_name localhost;
  server_tokens off;
  include /etc/nginx/includes/onlyoffice-documentserver-common.conf;
  include /etc/nginx/includes/onlyoffice-documentserver-docservice.conf;
}
## HTTPS host
server {
  listen 0.0.0.0:443 ssl;
  listen [::]:443 ssl default_server;
  server_name onlyoffice.mybusiness.com;
  server_tokens off;
  root /usr/share/nginx/html;
  
  ssl_certificate /etc/letsencrypt/live/onlyoffice.mybusiness.com/fullchain.pem;
  ssl_certificate_key /etc/letsencrypt/live/onlyoffice.mybusiness.com/privkey.pem;

  # modern configuration. tweak to your needs.
  ssl_protocols TLSv1.2;
  ssl_ciphers 'ECDHE-ECDSA-AES256-GCM-SHA384:ECDHE-RSA-AES256-GCM-SHA384:ECDHE-ECDSA-CHACHA20-POLY1305:ECDHE-RSA-CHACHA20-POLY1305:ECDHE-ECDSA-AES128-GCM-SHA256:ECDHE-RSA-AES128-GCM-SHA256:ECDHE-ECDSA-AES256-SHA384:ECDHE-RSA-AES256-SHA384:ECDHE-ECDSA-AES128-SHA256:ECDHE-RSA-AES128-SHA256';
  ssl_prefer_server_ciphers on;

  # HSTS (ngx_http_headers_module is required) (15768000 seconds = 6 months)
  add_header Strict-Transport-Security max-age=15768000;

  ssl_session_cache builtin:1000 shared:SSL:10m;
  # add_header X-Frame-Options SAMEORIGIN;
  add_header X-Content-Type-Options nosniff;
 
  # ssl_stapling on;
  # ssl_stapling_verify on;
  # ssl_trusted_certificate /etc/nginx/ssl/stapling.trusted.crt;
  # resolver 208.67.222.222 208.67.222.220 valid=300s; # Can change to your DNS resolver if desired
  # resolver_timeout 10s;
  ## [Optional] Generate a stronger DHE parameter:
  ##   cd /etc/ssl/certs
  ##   sudo openssl dhparam -out dhparam.pem 4096
  ##
  #ssl_dhparam {{SSL_DHPARAM_PATH}};

  location ~ /.well-known/acme-challenge {
     root /var/www/onlyoffice/;
     allow all;
  }
  include /etc/nginx/includes/onlyoffice-documentserver-*.conf;
}

Save the file, then reload nginx:

systemctl reload nginx

Navigate back to your web page onlyoffice.mybusiness.com and you should get the following now:

And if you do indeed see that screen then you now have a fully operational self-hosted OnlyOffice document server.

If you use these instructions, please let us know how it goes.  In a future article, we will show you how to update the container from the snapshot we created earlier.


VPN – To TCP, Or not to TCP – that is the question

So, when on travel, I notice the EXPLOINSIGHTS, Inc. OpenVPN server becomes a little unreliable (slow).  It was configured originally using UDP as the transfer protocol.  UDP is the faster of the modern two protocol options (UDP and TCP).  It’s fast because it throws data down the pipe and assumes it makes it to the right destination.  This is brilliant…when it works.  And when it doesn’t you want to use the slightly slower but much more robust TCP protocol, which actually checks to make sure the packets it sends make it to the right place!
So it’s a simple change: on Ubuntu, just edit your openvpn config at /etc/openvpn/server.conf, and change ‘proto udp’ to ‘proto tcp’.  Save config, restart your openvpn server (sudo service openvpn restart – or your server equivalent, or reboot server if more convenient for you).  If you run a different server distro, then just google your distro and openvpn.  It will give you links to show you where your config file is, but it could well be the same as above (so look there first!).
Now you need to make the same change for each of your client config files.  So whatever devices are using the VPN server, find their local config files (in windows it’s user/yourname/openvpn/config/file-name.ovpn) and make the same change as above.  No need to restart anything, just load the config into your client and run.  Hey presto, your server is running with TCP.  Enjoy a more reliable/consistent, and marginally slower vpn service.
🙂

Ubuntu Copying Microsoft

So Ubuntu are now starting to collect “telemetry data”.  It’s an opt-out “feature” (but not 100%), but this is a bad move.
Maybe time to start evaluating other distros, because it’s a slippery slope that WILL only mine more and more data with every release; and ultimately it will antagonize compliance requirements for EXPLOINSIGHTS Inc., which are already difficult enough to manage.